Bicycle Beanie Pattern

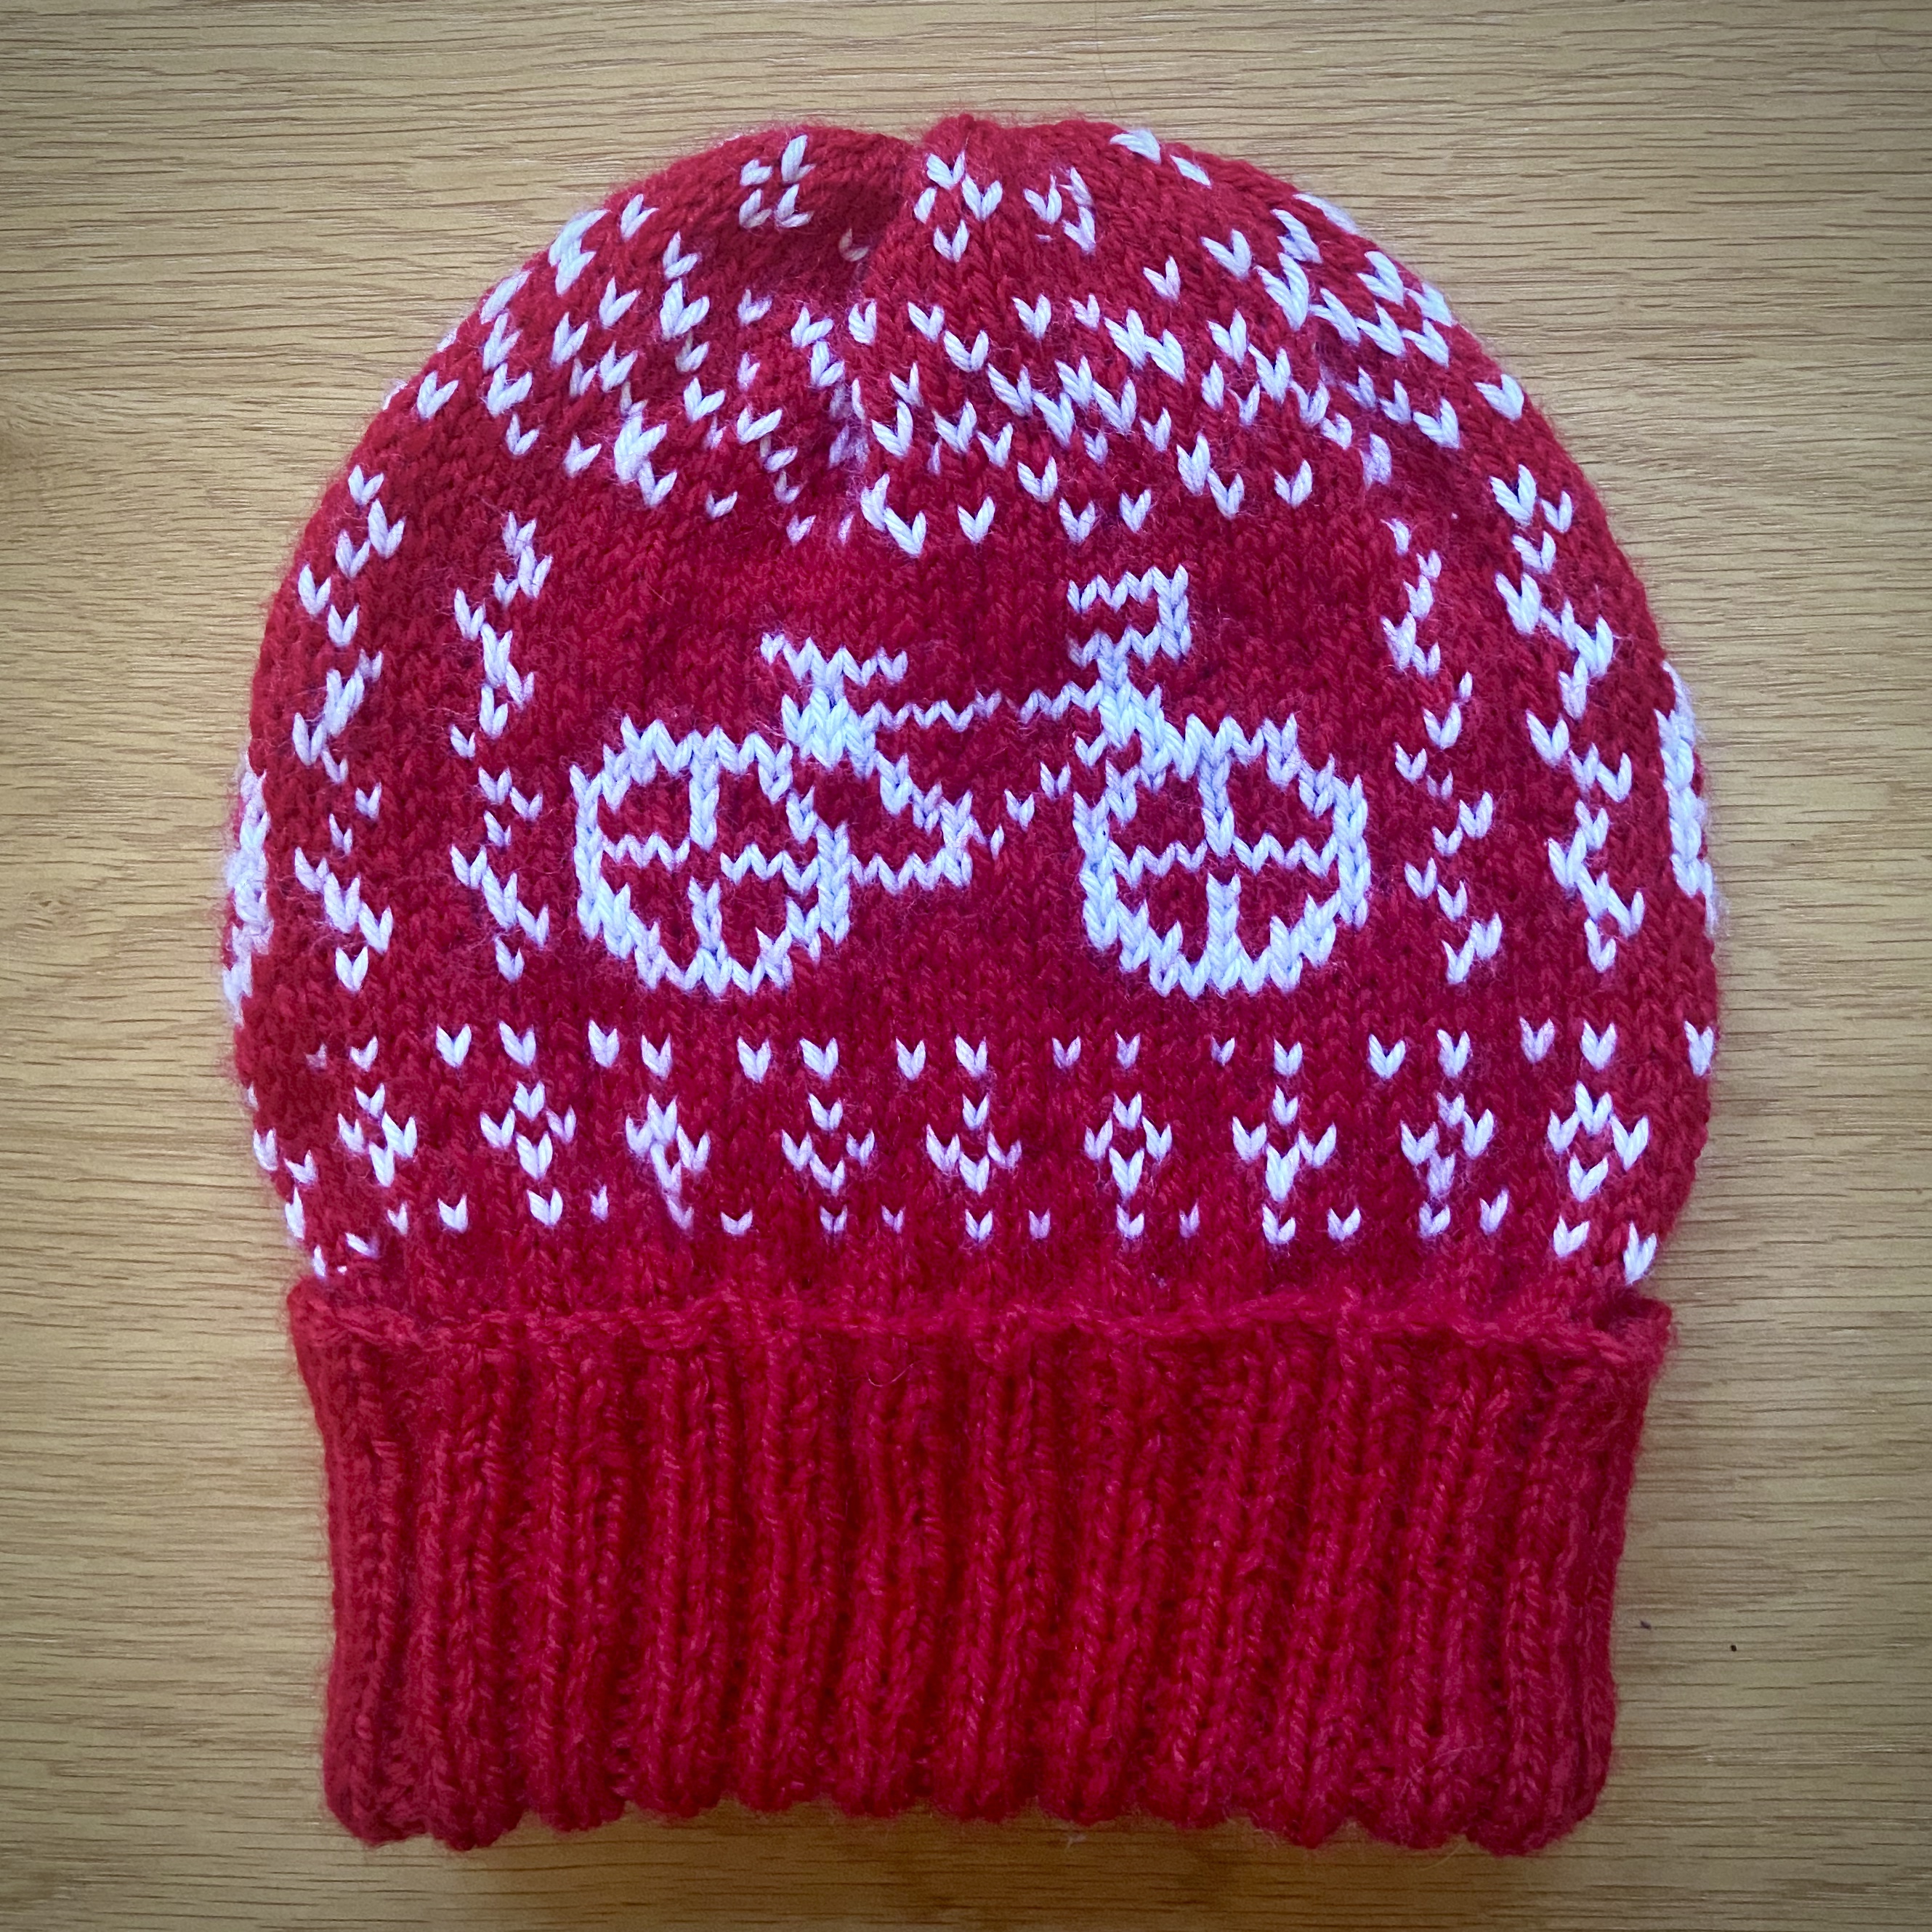
Fair isle looks tricky, but two-colour patterns are a great way to get yourself going. In reality, if you can knit a basic bobble hat, this isn’t actually much of a step up – but it certainly looks like one. And it’s incredibly satisfying seeing the pattern emerge as you complete each new round!

Despite this being my first fair isle design, I’m not actually much of a cyclist myself (no comments please from people who have seen me attempt a bike ride in recent years!) – but lots of my family and friends are much more proficient, so it’s proving a popular pattern for the winter season.

Note – this hat is designed to fit the average female head – if you’re looking to knit a man-sized number, I’d recommend sizing up to 5mm needles and an appropriate yarn to go with this. Both my husband and I managed to wear the original size, but we come from a household of relatively small heads!

What you’ll need:

  • 4mm circular knitting needles (or 5mm for the bigger heads amongst us!)
  • DK yarn for Colour A (c.185m)
  • DK yarn for Colour B (c.75m)
  • Yarn needle

Things to know:

  • Gauge: 4cm = 11 stitches and 11 rows in main pattern (knit stitch) on 4mm needles

How it’s done:

Knitting the brim:

  • Cast on 104 stitches in Colour A
  • (K2, P2) in the round until work measures approx. 13cm

Main pattern:

  • Knit one round, increasing by one stitch so that you have 105 stitches.
  • Join your second colour (Colour B) for the next round
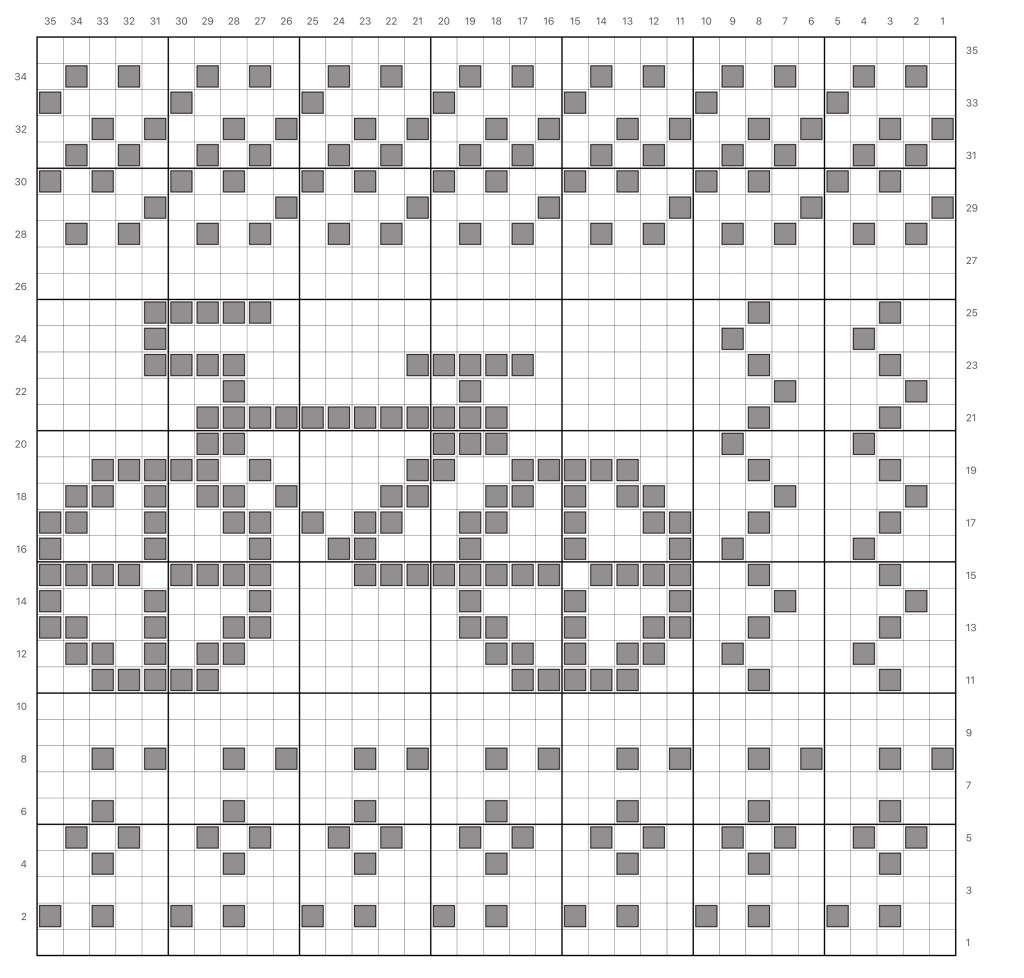
  • Follow the pattern below, using Colour A for the background and Colour B for the detail, repeating it 3 times for each round (3 sets of a 35 stitch pattern)

Decrease for crown:

  • Tie off Colour B
  • Continuing in Colour A, knit 3 more rounds. At this point, your hat should measure c. 20cm with the brim folded over [Note – if you’d like to add extra length to your hat, you can add additional rounds of knit stitch in Colour A here]
  • First round of decreases: (K1, K2tog) to end – 70 stitches remaining
  • Knit one round
  • Second round of decreases: K2tog to end – 35 stitches remaining
  • Knit one round
  • Third round of decreases: K2tog until 1 stitch before the end, then K1 – 18 stitches remaining
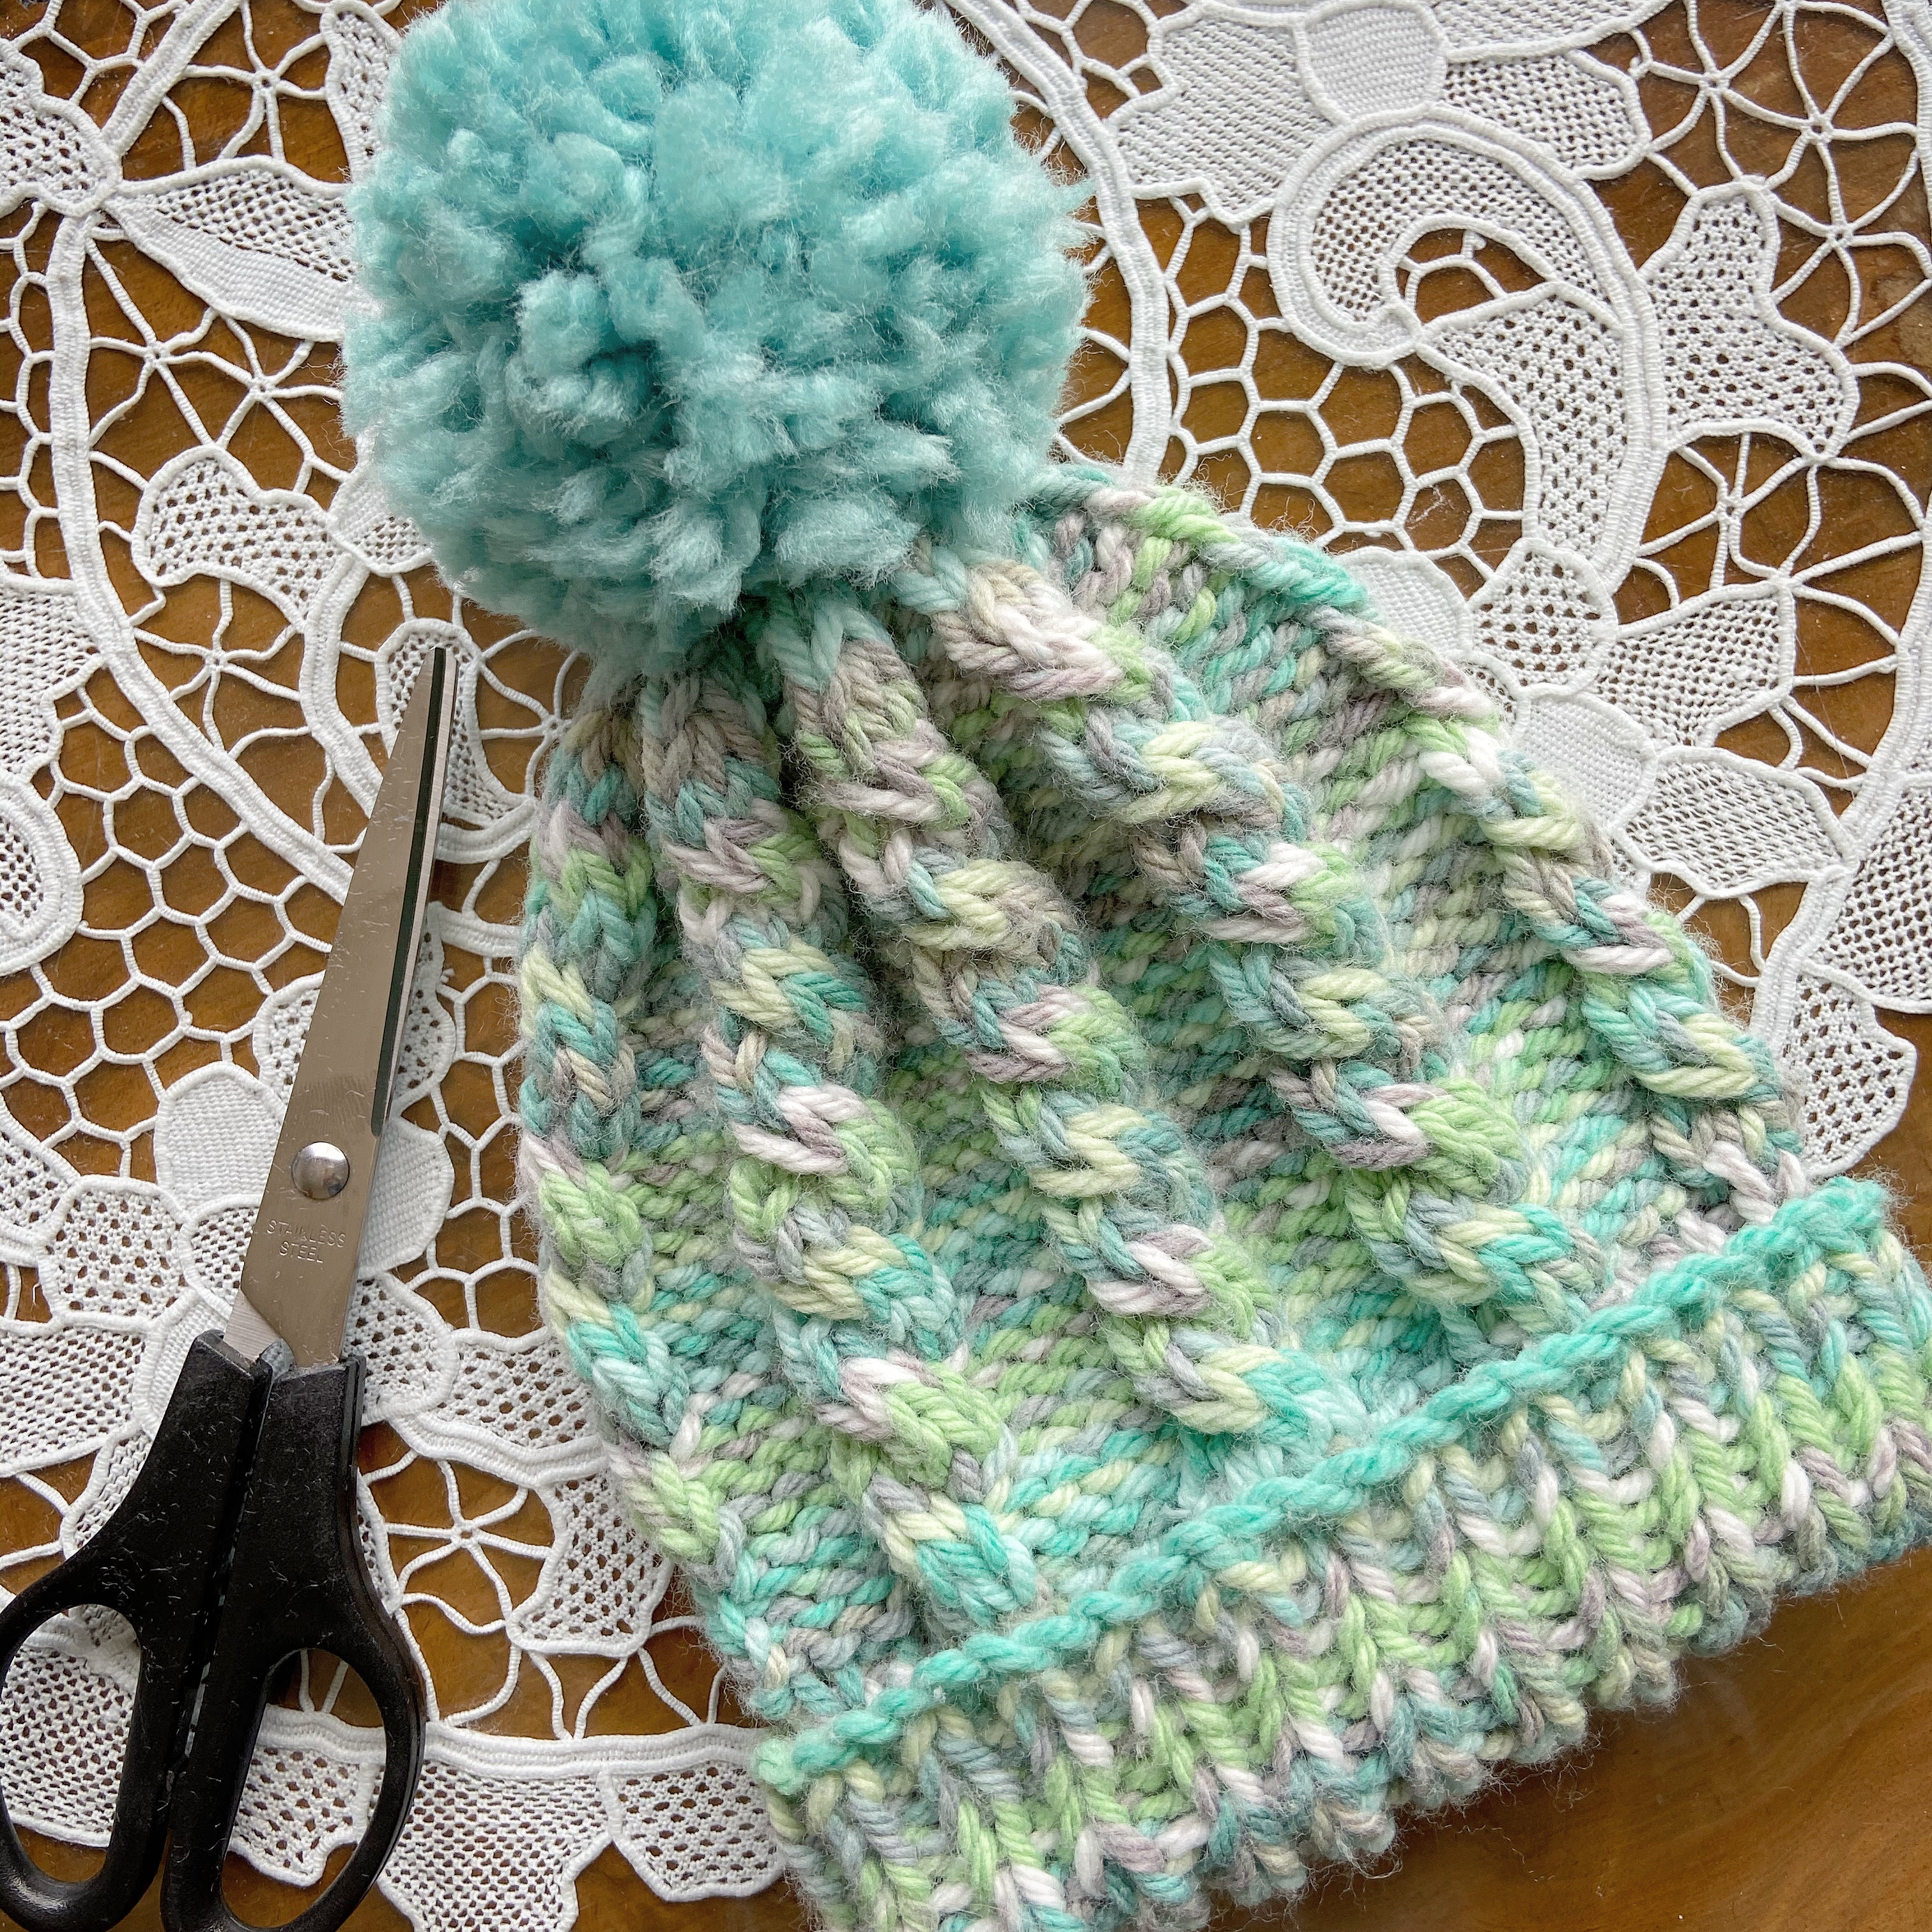
  • Cut yarn, leaving about 30cm tail. Draw yarn through remaining stitches, fasten, weave in ends, and attach your pom-pom

And here you have it – one perfectly formed bicycle hat! You can add a bobble at the end if that’s your vibe, or leave as is.

Happy knitting, and as always, please send me your photos of anything you’ve tried – you can also find me on Instagram as @craftitlikekatie

Featured

Artcuts Chiyogami Coasters

The weather has been crazy hot this week here in London, and so I’ve taken a break from my knitting projects and treated myself to some new wood-shape and paper-craft treats from one of my favourite craft suppliers, Artcuts.

Artcuts sell the most beautiful Chiyogami paper, which is perfect for use in découpage, because the fibres bond to the edges of wood shapes really well. This means that you can use it for smaller and more delicate shapes too, but coasters are the perfect first project to try it out for the first time.

Since starting to make these coasters, I’m a little bit obsessed (friends, family and distant connections, you know what you’re getting for Christmas!) – they’re easy to do, but come out looking beautifully professional.

What you need:

How it’s done:

  • Apply a light coating of PVA to one side of your coaster with a paintbrush, making sure that you don’t leave any gaps
Adding a layer of PVA glue
  • Place your Chiyogami paper down onto the coaster, and press it down, making sure you don’t get any air trapped. I use a jar or rolling pin to make sure it’s totally stuck down
  • Trim round the edges, leaving a small border
Sticking on the Chiyogami paper
  • Use your sandpaper or nail file to remove the excess paper from the edges of your coaster, pulling the sandpaper firmly down over the edges of the coaster to get a sharp edge. Don’t worry if you don’t get everything off in your first sweep, you can keep buffing it until it’s nice and clean. Artcuts have a great demo of how they do this here, which helps to visualise it if you’re not too sure
Sanding off the edges
Hooray, nice clean edges!
  • Finally, you just need to make sure that your coaster is waterproof – you don’t want the pattern to smudge and get soggy when you put a drink down. To do this, spread a couple of drops of varnish over the top and edges of your coaster – once I’ve covered it all, I brush over a final time in one direction with my paintbrush to get a tidy finish
  • Allow to dry, and repeat twice more. I also varnished the bottom of my coasters to make them more durable
Making sure it’s waterproof
  • As a final step, you may like to add a layer of felt to the bottom of your coasters, particularly if you’re super paranoid about scratches to your coffee table. It also adds a nice weighty feeling to them, which gives a bit of added luxury! All you need to do here is stencil round your coaster shape onto a piece of felt, cut it out, and then stick it on the bottom. Then, your coasters can slide across even the most expensive surfaces like a dream!

And that’s your coaster done! You can get four out of one pack of Chiyogami paper, so there’s lots of fun to be had trying out different sets, or doing a bit of mix and match.

Take a look below for a few that I made earlier – there are so many choices of pattern and colour that you can easily match them to your decor, or try out different styles for gifting.

You can find more on what I’m making on my Instagram page @craftitlikekatieand please send me photos of anything you’ve tried, I’d love to see them!

The Kerr Baby Beanie – Cabled Knitting Pattern

I haven’t written a blog post in a little while, as my actual job (which sadly doesn’t involve any wool) had a very busy start to the year. Fast forward a few months now though, and the UK is in lockdown, I no longer go into the office, and I’ve found myself able to get reacquainted with my wool stash. Knitting myself some new friends that I can see beyond Zoom calls is becoming a distinct possibility.

And so I haven’t yet baked banana bread, but I have devised a few new knitting patterns. Here’s a nice simple cabled baby hat that I tried out in chunky yarn. Like my other hats, I’ve kept to a literary theme – this one’s the Kerr Baby Beanie after Judith Kerr, who wrote the Mog books and The Tiger Who Came To Tea.

It’s designed for 0-3m babies and comes out at about 15cm width on the brim when laid flat. I did manage to get it onto my own undersized adult head with stretching, so there’s a bit of room to play with.

Take a look and let me know what you think!

What you need:

  • Chunky baby yarn, approx. 75 metres – I used a single skein of Sirdar Snuggly Baby Crofter Chunky in Fraser – if you use the same yarn, you might want to get two, as I finished with only a tiny bit left to spare!
  • 5mm circular knitting needles
  • 6mm circular knitting needles
  • Yarn needle for sewing up ends
  • Extra yarn for your pom-pom

Things to know:

  • K = knit
  • P = purl
  • C2F = slip 2 stitches onto your cable needle and hold it in front of your work, knit the next two stitches from your main needle, and then knit the two stitches from your cable needle
  • K2tog = knit two stitches together
  • P2tog = purl two stitches together

How it’s done:

Knitting the brim of your hat:

  • Take your 5mm needles, and cast on 64 stitches
  • Knit in rib stitch (K1, P1 repeated) in the round until your work measures 5cm

Knitting the body of your hat:

Switch to your 6mm needles

  • Rows 1-3: (K4, P4) to end
  • Row 4: (C2F, P4) to end

Repeat row 1-4 six times.

Decreasing for the crown of your hat:

Now it’s time to start decreasing your rows to shape the top of your hat.

  • Row 1: (K2tog x2 , P4) to end – 48 stitches remaining
  • Row 2: (K2, P2tog x2) to end – 32 stitches
  • Row 3: (K2tog, P2) to end – 24 stitches remaining
  • Row 4: (K1, P2tog) to end – 16 stitches

Cut your thread leaving approximately 15cm tail, and pull it through the remaining stitches. Pull tight to close the top of your hat, and secure with a knot.

Main part of the hat complete – now just the bobble left to add!

Making your pom-pom:

It’s now time to add your bobble – my favourite part of every hat!

My new and preferred method of doing this is with a pom-pom maker, as your bobbles come out super neat and don’t waste as much wool. I got mine from Fielders in Wimbledon (I highly recommend them if you are local), and they are also available at Hobbycraft in a range of sizes – my usual philosophy is the bigger, the better!

In case you don’t have a pom-pom maker handy, it’s still possible to make a perfectly good bobble using just your fingers and a pair of scissors. Get your chosen yarn, and wind it around three finger, leaving a 15cm length at the end for sewing it onto the hat. I went for about 200 winds, but you can vary it depending on how big you want the pom-pom to be. Then take a separate piece of thread and tie it through the middle of the wool – your pom-pom is now secure, so you can slide it off your fingers.

Now for the messy bit – I’d advise doing this over a bin! Get your scissors through the loops, and cut round the pom-pom. Once you’ve done this, keep trimming round the strands until your pom-pom is nice and even – kind of like giving it a hair cut! Make sure that you don’t cut off the long end that you need for sewing.

Once you’re happy with your pom-pom using either method, sew it onto the top of your hat, using the long end that hopefully survived the hair cut. If it didn’t, you can just sew a new length of yarn through the middle of the pom-pom.

And you’re finished! As always, I’d love to see your photos – please tag me on your Instagram as @craftitlikekatie or use the hashtag #craftitlikekatie

Ready for gifting!

Handmade Christmas Crackers

I don’t know about you, but when it comes to Christmas I tend to go slightly into ideas-overdrive. The last couple of years I’ve had my friends over to make Christmas wreaths, and this time I became slightly obsessed with the thought that there just MUST be some kind of secondary craft. After much exploration (this is why I never have any data left on my phone), I arrived at Christmas crackers.

Luckily my friends are very enthusiastic and supportive people, so they were up for trying this out with me. We have a girls’ Christmas day every year, and we decided that gifting each other with personalised crackers would be a great ceremony to add into the mix. I feel very lucky to have found such kindred spirits! 😂

What you need:

– Empty loo-roll cardboard tubes (great for recycling too!)

– A cracker template

– Good quality Christmas wrapping paper (Anthropologie and Paperchase have some great options)

– A craft knife (something like this)

– A cutting mat, or a chopping board that you don’t feel overly precious about (it’ll largely be fine, but you’ll be scoring it with your craft knife)

– Scissors

– Clear sellotape

Cracker snaps

– Paper hats – buy online or make your own!

– Ribbons to tie your crackers with (reasonably thin ribbon works well)

– Decorations for the outside of your crackers – I used snowflake embellishments from Paperchase and my favourite Hobbycraft scrabble tiles

– Jokes – again, you can buy these online or easily write your own ones. We went excessive and added a joke, an inspirational message (delivered with varying levels of seriousness) and a charade! Also a job you can outsource to husbands/partners/other family members if you’re not letting them use your craft knife

– A little gift to put inside the cracker – I found some little Christmas pegs in Paperchase for my friends, and for the family ones I bought little rubber drink markers that you put around your wine glass

How it’s done:

1) Cut your wrapping paper to the same length and width of your cracker template. Then lay the template on top of the paper, on top of your cutting board, and carve out the diamond shapes using your craft knife – voila, that’s by far the hardest bit done!

2) Place your hat, joke and gift inside the cracker, and roll the paper round the cardboard tube, taping it to hold. You can also tape the top ends of the cracker (the bits you pull) to make them neater

3) Cut two equal lengths of ribbon (I did about 15cm each) and tie either side of your cardboard roll, where your diamond cuts are. The cuts should make it scrunch nicely. You’ll want to make the tie tight enough that your gifts don’t fall out

4) And now, it’s just a matter of decorating your crackers – go minimalist, or go wild! We personalised ours with sticky scrabble tile letters, and put sparkly snowflakes either side

And that’s how you make a Christmas cracker! I’ve made two sets of these, and did one lot by myself in front of Netflix, and the other with my friends as a group craft activity – can confirm that both were successful. They also make lovely tree decorations before Christmas Day, so you’ve got a double whammy!

As always, I’d love to see your pictures if you try out any of my crafts, and please get in touch if you have any questions or suggestions. You can also find me on Instagram as @Craftitlikekatie. Happy crafting!

The Potter Beanie – double bobble baby hat

As you’ll have probably noticed, I’m normally a big fan of the super chunky knitting pattern. When my nephew was born though, my mother-in-law (who is supremely talented at knitting) made him some beautifully delicate hats with DK baby yarn, and I decided I’d have to give it a try.

I love trying out new patterns, and this one only requires you to know three stitches – so it’s perfect for beginners who are looking to give something new a go. I like to name my bobble hat patterns after authors that I love, and since this is a child’s hat, I’ve called it the ‘Potter Beanie’ – this is for Beatrix (of Peter Rabbit fame), not Harry!

Take a look, and let me know what you think!

You will need:

  • 3.25mm and 4mm circular needles, plus some slightly larger ones (4.5mm or 5mm) if you want to create a slight widening at the floppy bit of the hat)
  • DK baby yarn
  • Yarn needle for sewing up
  • Some extra yarn of your choice to make the pom-poms

Things to know:

  • Tension: 26 stitches and 30 rows to 10cm with 4mm needles
  • Abbreviations: K1 = knit one, P1 = purl one, Sl1 kw = slip one knitwise (if this is a new stitch for you, check out this video tutorial)
  • Sizes: Made to fit 0-6 months, with 6-12 and 12-18 months in parentheses

How it’s done:

Cast on 86 (90, 94) stitches with your 3.25mm needles.

Row 1: Knit all stitches

Row 2: Purl all stitches

This pattern is called garter stitch. Repeat rows 1 and 2 until your hat measures 5cm. This will then fold over to form the brim of your hat.

Now, it’s time for the body of the hat. Switch to your 4mm needles.

Row 1: Knit all stitches

Row 2: K1, Sl1 kw to end

Row 3: Knit all stitches

Row 4: Sl1 kw, K1 to end

Repeat rows 1-4 until your work measures 19 (20, 21) cm.

At this point, switch to your largest needles if you want a slight widening for the floppy bit of the hat. If you want it straight, just carry on as you are.

Carry on repeating rows 1-4 until your work measures 22 (23, 24) cm.

Cast off, and then sew up the seams at the top of the hat using a yarn needle.

Make two pom-poms. I did this by winding some DK yarn round two of my fingers 120 times, using the technique shown at the end of this blog post. Sew your two pom-poms onto the two top corners of the hat.

And you’re done! That’s one Potter Beanie ready to gift to a small person of your choice! I’d love to see your pictures, so please get in touch if you give this one a go – you can find me on Instagram as @craftitlikekatie