The Westover Beanie – chunky cable-knit bobble hat

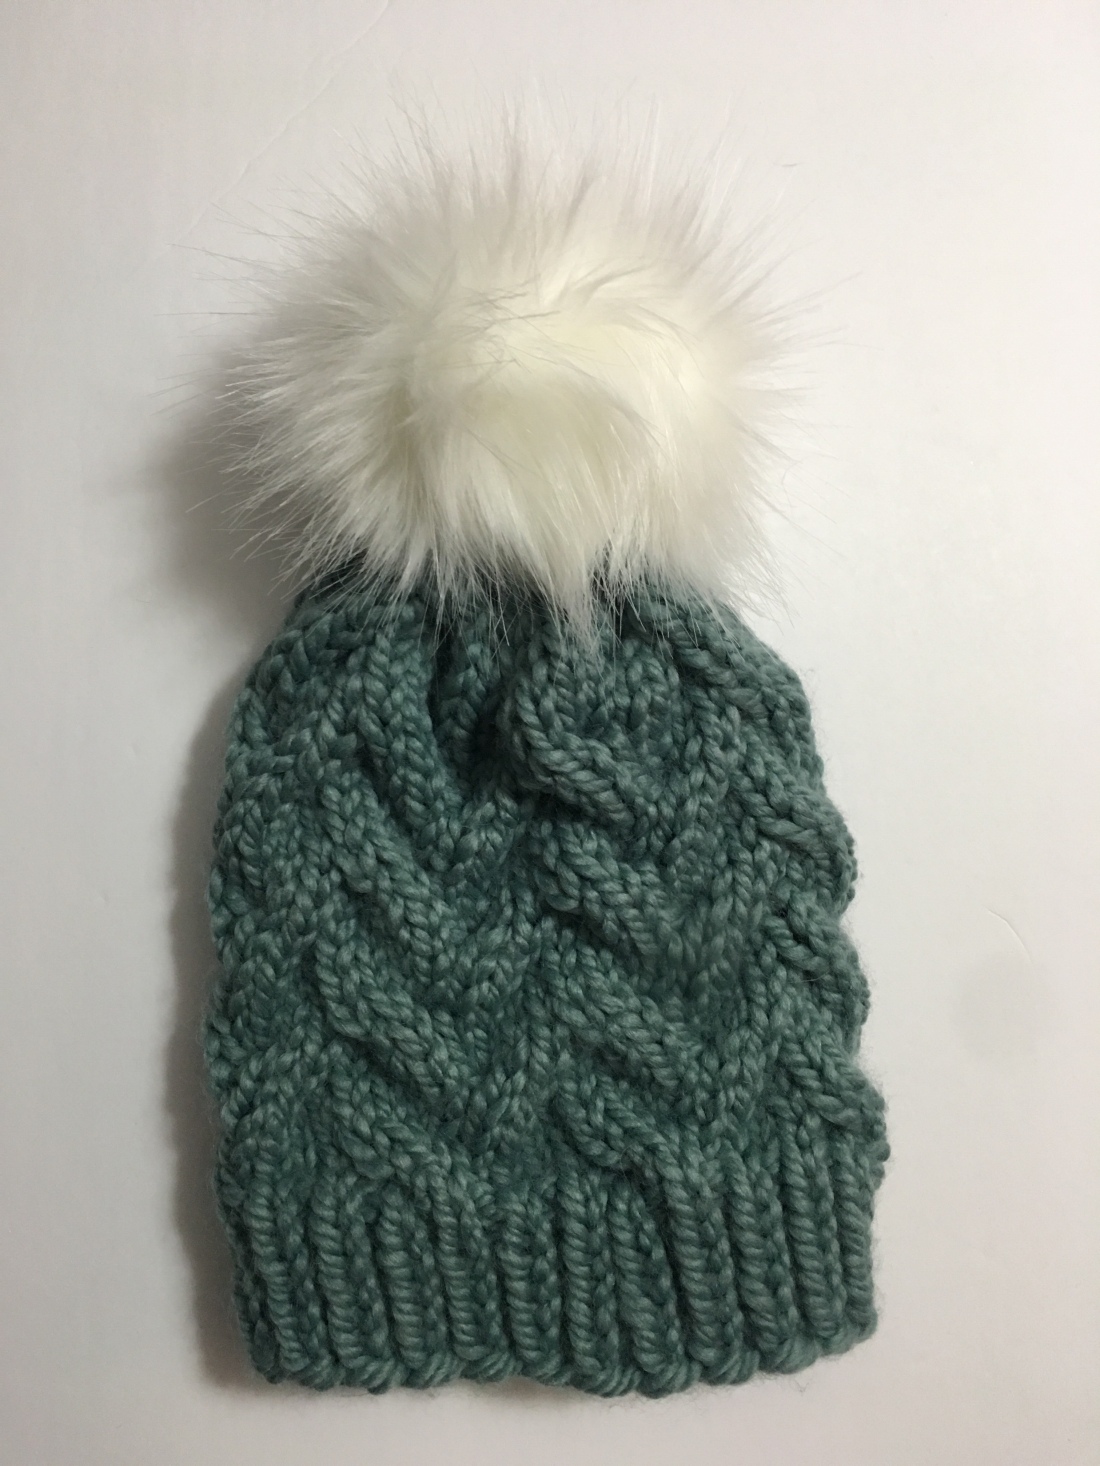
This beanie pattern is one of my favourites this year, and is easy to master whether you’re a cable expert or just learning. Like all of my new patterns, it’s named after one of my favourite authors – this one’s the Westover Beanie after Tara Westover, whose brilliant memoir ‘Educated’ we read at our book club a few months ago. Highly recommend!

This was also my first time using Malabrigo yarn – I spent all week on a significant money diet to justify buying it, and it was quite literally like unwrapping a woolly ball of joy. Must not become an addict…

Anyway, one Westover Beanie pattern, coming up…if you have go, please send me your photos!

You will need:

Abbreviations:

  • K1 = knit one
  • P1 = purl one
  • K2tog = knit two together
  • C2F = slip two sts on to the cable needle, bring them to the front of your work, knit the next two, then knit the stitches on your cable needle
  • C2B = slip two sts on to the cable needle, bring them to the back of your work, knit the next two, then knit the stitches on your cable needle

How it’s done:

Cast on 48 stitches using your 9mm needles

Rim of the hat – 1×1 rib stitch

  • Row 1: (K1, P1)
  • Rows 2-7: (K1, P1)
  • Body of the hat – switch to 10mm needles:
  • Rows 8-9: Knit all stitches
  • Row 10: (C2F, K4)
  • Rows 11-12: Knit all stitches
  • Row 13: (K4, C2B)
  • Three more rounds of cabling:
  • Rows 14-31: Repeat rows 8-13 three more times
  • Decrease for crown:
  • Row 32: (K2tog, K1) – 32 stitches
  • Row 33: knit to end
  • Row 34: – 16 stitches
  • Row 35: (K2tog) – 8 stitches
  • Cut your thread leaving approximately 10cm tail, and pull it through the remaining stitches. Tighten to close the top of the hat, and tie off.
  • You’re then ready to make your bobble. See my Rico Bobbles post for bobble instructions – also see image below for the dreamiest bobble yarn the world has ever seen!
  • No seaming to do (for circular knitting newbies like me, what a revelation!) Fold over the brim of your hat, and you’re the proud owner of a beautiful new knit!
  • For more free knitting patterns and craft inspiration, you can find me on Instagram as @craftitlikekatie – tag me in your makes!

  • Decoupage alphabet bunting

    My oldest friend is getting married this summer, so I got a bit overexcited about crafting for her hen party. You can see on my Instagram the sash that I made for her to wear too…although the approach for that was definitely too haphazard to merit a tutorial!

    An easier project was the alphabet bunting that I made to decorate the room at the hen party. I discovered Artcuts slightly by accident at the Knitting and Stitching Show in London, and after seeing all the beautiful projects they had on display, was set on creating one of my own.

    Although this was for a hen party, I think it’d look great (probably actually better!) in a child’s bedroom or on their door. Sadly, I don’t think my husband will let me make some for ours!

    What you need:

      String
      Decoupage paper – I used Artcuts chiyogami paper which is an absolute dream. I went with three different colours, but you can go for the same throughout if preferred
      PVA glue
      Sandpaper, or an entry board
      Ink pad and sponge to match your chosen colour scheme – I used Artcuts ink pads
      Scissors

    How it’s done:

    • Take your first letter, and stick it onto the decoupage paper using the PVA glue
    • With your scissors, cut around the edges of the letter, leaving about half a centimetre extra overlapping. Then, allow the glue to dry
    • Once dry, take your sandpaper and file the edges of your shape to take off the excess paper, making cuts where needed to fold the paper to the edge of the shape. There’s a great tutorial here on the Artcuts YouTube channel
    • Take a pencil to punch through the holes at the top for hanging
    • With your ink pad, lightly sponge a bit of colour along the edges of the shape to give it a rough outline
    • Thread your shapes onto string, and you’re ready to hang them!

    Monogram button box frame

    It’s been a big month in our household, as Rob and I have just become first-time uncle and auntie to our gorgeous new nephew, Rami. I finally got to meet him over Easter, aged just three weeks old – and it’s safe to say we’re all completely in love!

    First cuddles!

    Before Rami was born, we were both excitedly preparing for his arrival. Rob went out and bought the tiniest England rugby strip that he could find, and I was busy setting up a new ‘Baby Crafts’ board on Pinterest. Daily commute well spent! I still have lots of ideas on my list to try (just watch this space), but I’ll start by sharing one of my favourite new makes – a personalised button art frame.

    Now, I know that I say this a lot, but this one is pretty easy – and the end result is lovely. Any other babies wanting these, send them my way…or my adult friends might start getting button gifts instead!

    So, it’s button time…let’s get crafting!

    What you need:

    • A box frame – mine was the 18x18cm white shadow box frame from Hobbycraft
    • Some nice paper/card for backing – I found some handmade Indian paper in my parents’ garage (the benefit of having a family business dealing in art supplies!)
    • An assortment of buttons in your chosen colour scheme – I found these buttons at Hobbycraft for only a pound, and they worked perfectly!
    • Small beads to fill in the gaps – mine were Hobbycraft seed beads
    • A cut-out shape for your main monogram letter, that’s about half the size of your frame. I used the Alphabet Bunting Letters from Artcuts, which is my new favourite craft crush – once you visit their site, please don’t hold me accountable for how much you buy!
    • Small letters for the name – I used Hobbycraft wooden letter tiles
    • Tacky glue for sticking the buttons on
    • Decorative bits and pieces to fill space around the letter – I went for some wooden stars and silver pearl craft stickers from Artcuts
    • An ink pad or paint for your main letter and any other wooden decorations that you’re sticking on – I used an Artcuts ink pad which I already had from another secret project that I’ve been working on. This should match your main colour scheme, in case you have any gaps between your buttons and beads.

    How it’s done:

    • Cut your backing paper/card to fit your frame
    • Using your ink pad, colour your main monogram cut-out shape and let dry. I also coloured the wooden star decorations that I had at the same time
    • Once your letter shape is dry, use your tacky glue to stick buttons onto it. Try not to go too much over the edges (a little bit is fine) to keep the definition of the letter, and mix up sizes and colours. Don’t worry if there are gaps between the buttons – this is what beads are for!
    • Let your buttons dry onto the shape, and then cover the gaps with tacky glue. Take your beads, and use these to cover the gap/
    • If you’re using painted stars like I did, then stick your silver pearl craft gems into the middle of them to add a bit of sparkle!
    • Once everything has dried, position your main letter onto your card backdrop, along with the letter tiles to spell the full name, and the decorative stars. When you’re happy with the position, take your tacky glue and stick it all down
    • And finally, place everything into your frame!

    Now that I’ve gotten started on button crafts, I can’t wait to try my next frame. As always, if you give this craft a go, please send me your pictures – I’d love to see them!


    Decoupage bridesmaid dress hangers

    If you’re looking for beautiful, handmade hangers for your wedding party dresses, there’s a load of choice out there – my Pinterest wedding board knew this well. But amidst the endless pay-outs that come with planning a wedding, you might not really want to start spending more money.

    So why not make them yourself? It’s really easy (and fun too), I promise!

    Decoupage sounds fancy (it’s a French word, of course it does), but it’s basically just a case of gluing pieces of paper onto something else to make it look prettier. Totally accessible for even the most amateur crafter.

    Ready to make some basic wooden coat hangers look really pretty?

    As with most decoupage projects, this one requires a fair few ‘glue-drying’ cycles. So it’s super easy, but maybe not one to leave until the night before!

    What you need:

    • Wooden coat hangers – such as these from Argos
    • Decoupage paper – I used a range of different colours for the bridesmaids’ hangers, and then a single white sparkly paper for mine. Hobbycraft do a great range here
    • Decoupage glue – I used Mod Podge, which was my new best friend after making my foil monogram letters
    • Black Sharpie pen
    • Plain card for writing names – mine was Hobbycraft Kraft Brown Premium Card, which I also used for our orders of service
    • Scissors
    • Sponge brush or thick paintbrush to apply the glue

    What to do:

    • First, cut out rectangles of your plain card that are just a bit smaller than the top section of your hanger
    • Using your black Sharpie pen, write your first bridesmaid’s name onto the card. I used an online calligraphy generator to stylise the script (my handwriting isn’t great, but I’m a pretty good copier!)
    • Let your ink dry, and then glue your name label to the front of the hanger
    • Next, you’re ready to decoupage! Apply a layer of glue to the front of your hanger, also making sure to cover your name label
    • Tear up your decoupage paper, and start sticking pieces onto the front of the hanger. You can mix up different colours and different-sized pieces as much as you like. Make sure that you don’t cover up your name label, but overlap onto the card slightly to soften the edges
    • Now it’s a bit of a waiting game – you’ll need to let your front side dry before you start working on the back and sides (unless you want to come back and find your hanger stuck to the table!) I did the front side of all six hangers in one go to speed this stage up
    • Once dry, do the same tear and stick job on the back and sides of your hangers – and let dry again
    • Repeat these steps for both sides one more time to get good coverage – sometimes the paper can look a little see-through if you only do one layer

    After you’re happy with the effect, all you have to do is sit through one more drying cycle, and your hangers are ready to go.

    Cheap, personal and handmade all the way!

    As always, I would absolutely LOVE to see your photos if you try this out – so hit me up crafters…

    The Morris Beanie – chunky cable-knit bobble hat

    This little mustard number was made as a going away gift for my lovely friend Georgi, who is about to set off on a 6-month secondment to South Africa. It’s summer there at the moment, but being prepared for autumn/winter is obviously very important.

    So, this hat was kind of a big deal, because it was my first real foray into circular knitting. Having stuck solidly to flat-knit bobbles, I’d been putting this off – but after creating my Chunky flat-knit cable hat pattern, I knew that it was time.

    An off-the-record tip for anyone who’s feeling a bit nervous about circular knitting – I actually knit the first couple of rows of this on straight needles, before swapping into the round. This means that you’ve got your tension right from the start, and you can seam up the tiny bit that isn’t joined at the end. Not exactly by the book, but it worked wonders for me!

    I’ve decided to name my patterns based on some of my favourite authors – still an English Lit student at heart! This one’s the Morris Beanie, named after Heather Morris, writer of the amazing book The Tattooist of Auschwitz. Hope that you enjoy the pattern, and check out the book too if you haven’t already!

    You will need:

    • 8mm circular knitting needles
    • 9mm circular knitting needles
    • Cable needle
    • 1 skein of super chunky yarn for colour A. I used Women’s Institute Soft and Chunky Yarn from Hobbycraft, which is a bit less heavy than my usual choices, but worked really well
    • A second colour of super chunky yarn (I used the Rico yarn in a navy blue) if you want to do a colour B on the rim. You don’t need much of this, so could be an opportunity to use up leftovers!
    • Yarn for your pom-pom – I am currently obsessed with this Sirdar Alpine Luxe Fur Effect Yarn – it makes the most gorgeous and fluffy pom-poms ever!
    • Sharp scissors for making your pom-pom (sorry Rob, I used the kitchen scissors again!)
    • Yarn needle for attaching your pom-pom

    How it’s done:

    Cast on 56 stitches using your 8mm needles in colour B (if using two colours – if not, just stick with the same one throughout)

    Rim of the hat – 1×1 rib stitch

    Row 1: (K1, P1)
    Rows 2-14: Switch to colour A, (K1, P1)

    Body of the hat – switch to 9mm needles:
    Rows 15-19: (K4, P4)
    Row 20: (C2F, P4)
    Row 21: (K4, P4)

    Two more rounds of cabling

    Rows 22-35: Repeat rows 15-21 twice

    Decrease for crown:

    Row 36: (K2tog, K2tog, P4) – 42 stitches
    Row 37: (K2, P2tog, P2tog) – 28 stitches
    Row 38: (K2tog, P2) – 21 stitches
    Row 39: (K1, P2tog) – 14 stitches
    Row 40: (K2tog) – 7 stitches

    Cut your thread leaving approximately 10cm tail, and pull it through the remaining stitches. Tighten to close the top of the hat, and tie off.

    You’re then ready to make your bobble. See my Rico Bobbles post for bobble instructions – also see image below for the dreamiest bobble yarn the world has ever seen!

    No seaming to do (for circular knitting newbies like me, what a revelation!) Fold over the brim of your hat, and you’re the proud owner of a beautiful new knit!

    For more free knitting patterns and craft inspiration, you can find me on Instagram as @craftitlikekatie – tag me in your makes!